DD-WRT Dynamic DNS with AWS Route53
Description
The post will describe the steps I have taken so my Netgear R7000 router running DD-WRT firmware to dynamically update a DNS record on AWS Route53 on WAN IP changes.
Why use Route53 for DynamicDNS
I run a home VPN server to remotely connect to my home network and route my mobile phone traffic through. My ISP uses a dynamic IP address and I suffer frequent disconnects even though speed is good. This means daily IP changes if not more! Using a static hostname i.e vpn.example.com and having the router automatically update Route53 with new IP addresses means I can consistently connect to my home VPN using a single host name without having to worry about IP changes.
DD-WRT comes with built in support for DynDNS and other services however I use AWS and which to use a vanity host name.
How, the instructions
Create a Route53 hosted zone
For this example we will assume our DNS hostname is example.com and we wish to have vpn.example.com dynamically updated to point to the routers external wan IP.
In Route53 the hosted zone we will assume example.com already exists.
For vpn.example.com rather than add a new record set to the exiting hosted zone we will create a new hosted zone for vpn.example.com. The reason behind this is AWS IAM does not allow fine grained controls on updating specific records in a hosted zone and we want a limited AWS user account to use from the router that only has permission to update the DNS entry for vpn.example.com and no other AWS permissions.
After creating the vpn.example.com hosted zone add a new NS record set copying the values of the NS record from the root example.com zone.
Note: AWS charges per hosted zone so we will be charged for two hosted zones above for the extra security.
Create a restricted system user
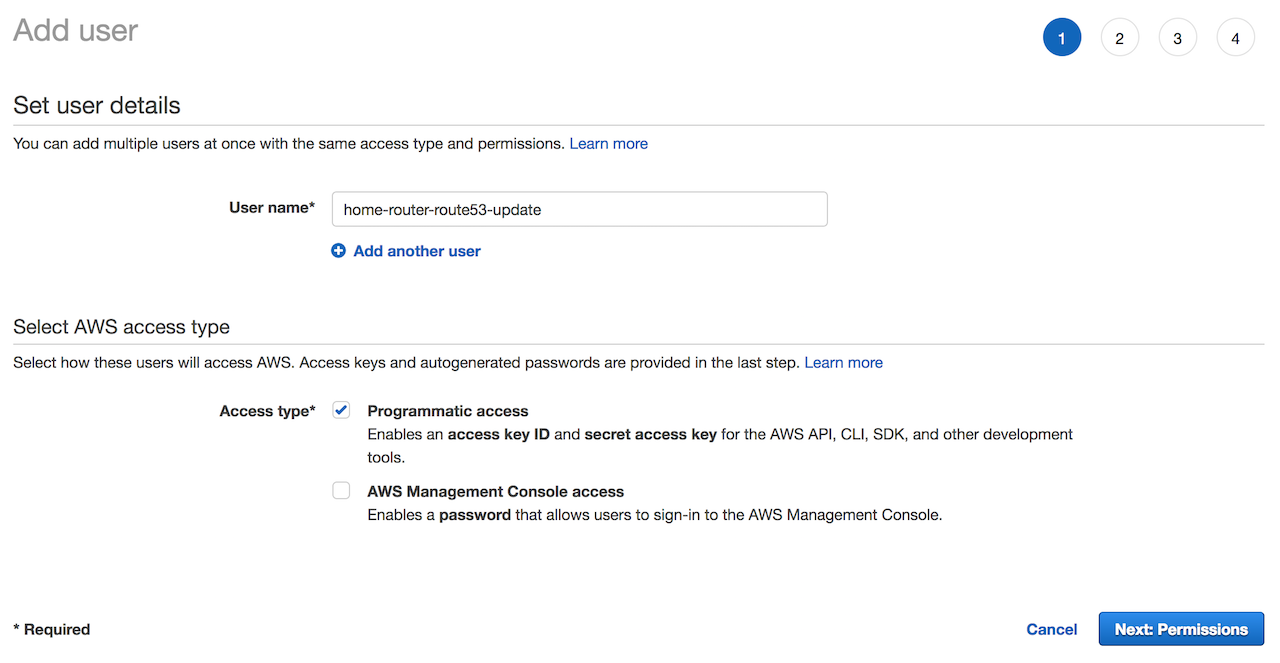
- In the AWS console go to the IAM section, then click `Users`.
- Click
Add Usergive it a usernamehome-router-route53-update. ForAccess typeselectProgamattic accessthen clickNext: Permissions:
- On the next screen select
Attach existing policies directly, then clickCreate Policy, this will open a new window:
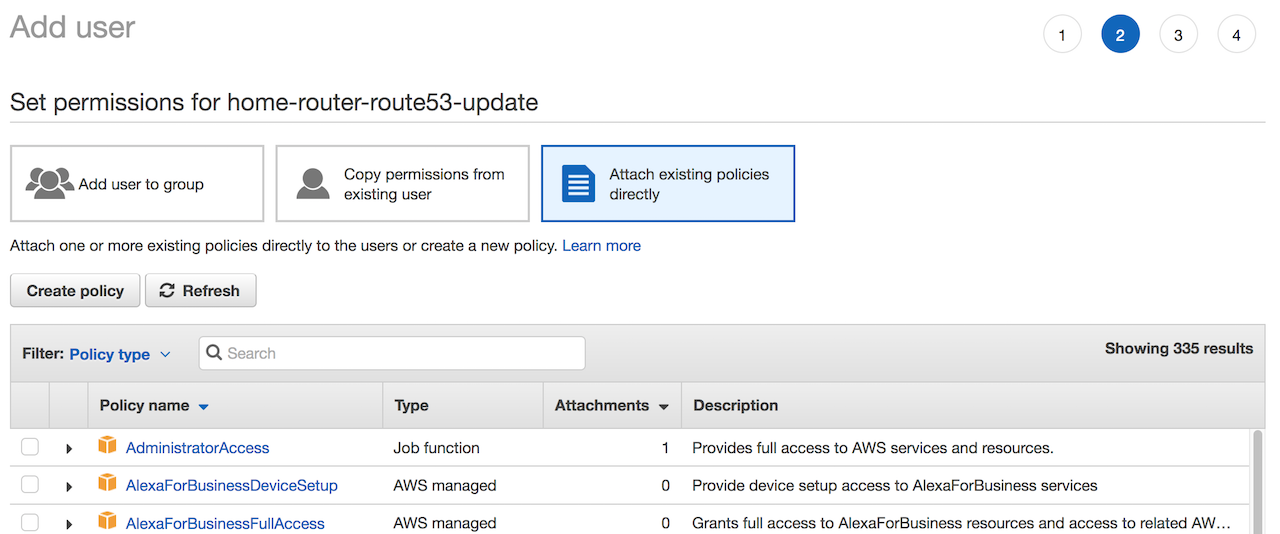
- Click
JSONthen paste in the below, changeMYZONEIDwith the zone id forvpn.example.comdisplayed in Route53 created previously.
{
    "Version": "2012-10-17",
    "Statement": [
        {
            "Sid": "AllowUpdateDns",
            "Effect": "Allow",
            "Action": "route53:ChangeResourceRecordSets",
            "Resource": "arn:aws:route53:::hostedzone/MYZONEID"
        }
    ]
}
- Click
Review policy, on the next screen give it aNameAllowUpdateDnsthen clickCreate policy. - Go back to the previous add user window, click the
Refreshbutton next toCreate Policythen in the search box typeAllowUpdateDNS, select it and clickNext: Review. - On the next page click
Create User. - On the next page copy the
Access key IDvalue andSecret access keyvalue. Keep these secure and do not loose them, these are the credentials used on the router to make Route53 API calls for updating the DNS.
DNS update script
This is the most complex part. DD-WRT has a restricted set of applications installed, aws-cli or alternatives are not available on the router so we need to write a statically compiled binary that will run on the ARM cpu that will communicate with Route53 to update the DNS on wan ip changes.
For this we will use Go as the Go AWS SDK has better documentation than their C++ SDK and Go supports ARM static binary compilation. This is not advocating Go!
I was unable to get go cross-compilation working from OSX as am a mac desktop user so I used scaleway.com for a cloud based ARM server to build the binary. If you have a RasberryPi or other ARM based server available, or know about Go and cross compilation you can skip Scaleway, if not go and sign-up, create a C1 server instance with Ubuntu Xenial which was Scaleway’s latest Ubuntu distribution as of writing this.
Once the server is created SSH on to it.
Next install Go 1.10. Xenial has Go 1.6 by default and we need Go 1.10 so we can use the SSL_CERT_FILE parameter further on, Go 1.6 has a hard coded list of ssl cert locations for some obscure reason and they will not work for us.
Install Go 1.10:
sudo add-apt-repository ppa:longsleep/golang-backports
sudo apt-get update
sudo apt-get install golang-go
Once that is done we create the Route53 update app:
mkdir route53-update
cd route53-update
export GOPATH=$PWD
Next type vi app.go and paste in the below then save it. This is script is hacked together from the AWS Go SDK examples, I am not a Go developer. It essentially is a command line application which takes 3 parameters:
- the zone id
- the hostname
- the new ip address.
package main

import "fmt"
import "os"
import "github.com/aws/aws-sdk-go/aws"
import "github.com/aws/aws-sdk-go/aws/awserr"
import "github.com/aws/aws-sdk-go/aws/session"
import "github.com/aws/aws-sdk-go/service/route53"

func main() {
  if len(os.Args) != 4 {
    fmt.Println("usage: route53-update zoneid hostname ip")
    os.Exit(64)
  }

  svc := route53.New(session.New())
  input := &route53.ChangeResourceRecordSetsInput{
      ChangeBatch: &route53.ChangeBatch{
          Changes: []*route53.Change{
              {
                  Action: aws.String("UPSERT"),
                  ResourceRecordSet: &route53.ResourceRecordSet{
                      Name: aws.String(os.Args[2]),
                      ResourceRecords: []*route53.ResourceRecord{
                          {
                              Value: aws.String(os.Args[3]),
                          },
                      },
                      TTL:  aws.Int64(300),
                      Type: aws.String("A"),
                  },
              },
          }
      },
      HostedZoneId: aws.String(os.Args[1]),
  }

  result, err := svc.ChangeResourceRecordSets(input)
  if err != nil {
      if aerr, ok := err.(awserr.Error); ok {
          switch aerr.Code() {
          case route53.ErrCodeNoSuchHostedZone:
              fmt.Fprintf(os.Stderr, route53.ErrCodeNoSuchHostedZone, aerr.Error())
          case route53.ErrCodeNoSuchHealthCheck:
              fmt.Fprintf(os.Stderr, route53.ErrCodeNoSuchHealthCheck, aerr.Error())
          case route53.ErrCodeInvalidChangeBatch:
              fmt.Fprintf(os.Stderr, route53.ErrCodeInvalidChangeBatch, aerr.Error())
          case route53.ErrCodeInvalidInput:
              fmt.Fprintf(os.Stderr, route53.ErrCodeInvalidInput, aerr.Error())
          case route53.ErrCodePriorRequestNotComplete:
              fmt.Fprintf(os.Stderr, route53.ErrCodePriorRequestNotComplete, aerr.Error())
          default:
              fmt.Fprintf(os.Stderr, aerr.Error())
          }
      } else {
          fmt.Fprintf(os.Stderr, err.Error())
      }

      os.Exit(1)
  }

  fmt.Println(result)
}
Build it:
CGO_ENABLED=0 GOOS=linux GOARCH=arm GOARM=5 go build -a -ldflags '-w -s -extldflags "-static"'Once it’s built, download the route53-update binary file using scp and copy it to /jffs/bin.
Note: if you run the file cmd on the binary you should see the below output. It needs to be statically linked and I also noticed it needed the debug info stripped to work. If you do not see the below verify your Go build parameters.
❯ file route53-update
route53-update: ELF 32-bit LSB executable, ARM, EABI5 version 1 (SYSV), statically linked, stripped
Enable JFFS2 on the router
JFFS2 is the routers internal flash storage. Any data that needs to persist though router restarts should be placed in the JFFS2 enabled flash storage.
To enable JFFS2 click the Administration tab in the web gui, then Management if it is not already selected. 
Scroll down to the JFFS2 Support section, make sure:
Internal Flash Storageis enabledClean Internal Flash Storageis disabled
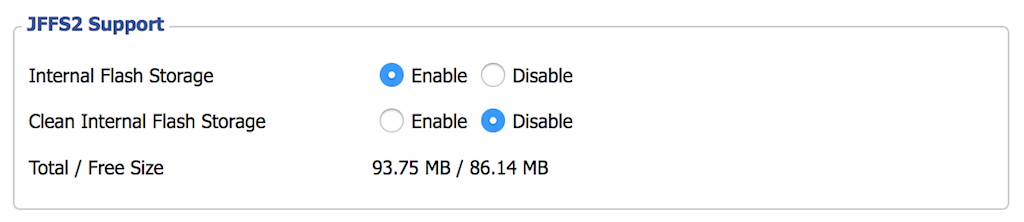
Scroll to the bottom of the page, click Save then Apply Settings
Create /jffs/bin folder
Create a /jffs/bin folder. Assuming you are connected via SSH in
mkdir /jffs/binThen copy the route53-upload binary previously build and downloaded to the folder using scp:
scp PATH/TO/route53-upload root@192.168.1.1:/jffs/binCreate /jffs/ssl/certs folder
The route53-update application talks to the AWS API’s using SSL. DD-WRT does not look to have a valid certificate chain file anywhere so the script will fail with an SSL error.
To fix this, on the router run:
mkdir -p /jffs/ssl/certs
Next go to https://curl.haxx.se/docs/caextract.html, download the cacert.pem file and copy it to the /jffs/ssl/certs folder using scp as we did in the previous step.
Create /jffs/etc/config folder
Run the below command
mkdir -p /jffs/etc/configDD-WRT on startup will look in the /jffs/etc/config directory if present and will execute all *.wanup scripts when the wan interface comes up, i.e when we get an internet connection / new ip.
You can also add *.startup scripts to this folder which get executed when the router starts up. Ref. Script Execution.
Create /jffs/etc/config/updatedns.wanup file
Create the below file at /jffs/etc/config/updatedns.wanup. Update the AWS_ACCESS_KEY_ID, AWS_SECRET_ACCESS_KEY, DOMAIN_NAME and ZONE_ID values to match what you have.
#!/bin/sh  -e

DOMAIN_NAME="vpn.example.com"
ZONE_ID="CHANGE_ME"

export AWS_ACCESS_KEY_ID="CHANGE_ME"
export AWS_SECRET_ACCESS_KEY="CHANGE_ME"

export PATH="${PATH}:/jffs/bin"
export SSL_CERT_FILE="/jffs/etc/ssl/certs/cacert.pem"

main () {
  local wan_ip=$(nvram get wan_ipaddr)

  if [[ -n "${wan_ip}" ]]; then
    # WAN seems to go down a lot, let's track it
    echo "$(date -Iseconds) ${wan_ip}" >> /var/log/wan-ip-change.log
  else
    echo "$(date -Iseconds) Error updating DNS entry, wan_ip is empty" >> /var/log/wan-ip-change.error.log
    exit 1
  fi

  route53-update "${ZONE_ID}" "${DOMAIN_NAME}" "${wan_ip}" 2> /var/log/wan-ip-change.error.log
}

main
Next make sure it executable:
chmod +x /jffs/etc/confg/updatedns.wanupFinally we can test the script by running it:
/jffs/etc/config/updatedns.wanupThe DNS in Route53 should be updated, if not check the /var/log/wan-ip-change.error.log file for errors:
cat /var/log/wan-ip-change.error.log